Spring Cloud微服务 03:Spring Boot源码初探
SpringApplication
Class that can be used to bootstrap and launch a Spring application from a Java main method. By default class will perform the following steps to bootstrap your application:
- Create an appropriate ApplicationContext instance (depending on your classpath)
- Register a CommandLinePropertySource to expose command line arguments as Spring properties
- Refresh the application context, loading all singleton beans
- Trigger any CommandLineRunner beans
SpringApplications can read beans from a variety of different sources. It is generally recommended that a single @Configuration class is used to bootstrap your application, however, you may also set sources from:
- The fully qualified class name to be loaded by AnnotatedBeanDefinitionReader
- The location of an XML resource to be loaded by XmlBeanDefinitionReader, or a groovy script to be loaded by GroovyBeanDefinitionReader
- The name of a package to be scanned by ClassPathBeanDefinitionScanner
除了用@Configuration标记的类可以启动应用,还有上面介绍的3种方式可以启动应用。
构造方法
看看构造方法的说明:
Create a new SpringApplication instance. The application context will load beans from the specified primary sources (see class-level documentation for details. The instance can be customized before calling run(String…).
创建一个SpringApplication,应用上下文从指定的primary sources加载bean。
构造方法的实现里有一行this.webApplicationType=WebApplicationType.deduceFromClasspath();,这行决定了应用是用的什么web容器启动的,非web环境,Servlet容器,或者Reactive(Spring 5新增的)。
1 | public SpringApplication(ResourceLoader resourceLoader, Class<?>... primarySources) { |
再看下一行代码setInitializers((Collection) getSpringFactoriesInstances(ApplicationContextInitializer.class));里面的具体内容都干了些什么。
从getSpringFactoriesInstances方法代码里执行跟到SpringFactoriesLoader.loadSpringFactories这个方法中,有行很关键的代码:
1 | Enumeration<URL> urls = (classLoader != null ? |
urls就包含了所有jar包里的spring.factories文件。
SpringFactoriesLoader是框架内部用来加载工厂的一种机制,它会读取META-INF/spring.factories这个文件的内容,这个文件存在于多个jar文件中(所有的spring.factories都会被读取并加载),随便看一个,比如spring-boot-autoconfigure-2.1.4.RELEASE.jar里的,定义了7种类型的类,Spring会去加载这个文件中定义的工厂信息配置文件,左边都是接口或者抽象类,右边都是具体的实现类。
1 | # Initializers |
在读取了这些文件内容以后,文件里的内容就会作为缓存把数据放入到private static final Map<ClassLoader, MultiValueMap<String, String>> cache = new ConcurrentReferenceHashMap<>();中。
接下来,就获取了key为org.springframework.context.ApplicationContextInitializer的类列表。
这里也对应了前面提到过的
1 | setInitializers((Collection) getSpringFactoriesInstances( |
后面就是通过反射的方式来创建这些ApplicationContextInitializer工厂类的实例。
1 | List<T> instances = createSpringFactoriesInstances(type, parameterTypes, |
再下一行的setListeners((Collection) getSpringFactoriesInstances(ApplicationListener.class));也是一样的逻辑,只不过这次是从缓存里获取的class名称了。
到这里ApplicationContextInitializer和ApplicationListener都实例化完成。
再往下面看this.mainApplicationClass = deduceMainApplicationClass();
1 | private Class<?> deduceMainApplicationClass() { |
万万没想到,Spring Boot竟然是通过这种方式来找到main方法所在类的,直接new一个RuntimeException(),然后从堆栈里去找main方法所在的类。
SpringApplication对象构造完成后,接下来就调用了run()方法。
run()方法& ApplicationContext
运行Spring应用,创建并且刷新一个新的ApplicationContext,在run方法中执行了很多代码,下面一一进行分析。
1 | /** |
首先就声明了变量,ConfigurableApplicationContext context = null;
ApplicationContext是Spring里非常重要的一个接口,看看它的注释。
是一个中心的接口,为一个应用提供了配置。当应用在运行的时候,它是只读的,但是如果实现支持的话,可以被重新加载。
提供的功能如下:
- 提供了访问应用组件的bean工厂方法,继承自ListableBeanFactory
- 加载文件资源的能力,继承自 ResourceLoader接口
- 向注册的监听器发布事件的能力,继承自ApplicationEventPublisher接口
- 解析消息的能力,支持国际化,继承自MessageSource接口
- 继承父上下文的相关信息。子上下文有更高的优先级
ConfigurableApplicationContext会被大多数应用上下文实现,比ApplicationContext又多补充了些功能。
再往下就是异常报告器,用于支持对SpringBootApplication启动错误的报告。
1 | Collection<SpringBootExceptionReporter> exceptionReporters = new ArrayList<>(); |
再往下的代码,就是将系统属性设置为无头模式,表示是没有界面的服务器程序。
1 | private void configureHeadlessProperty() { |
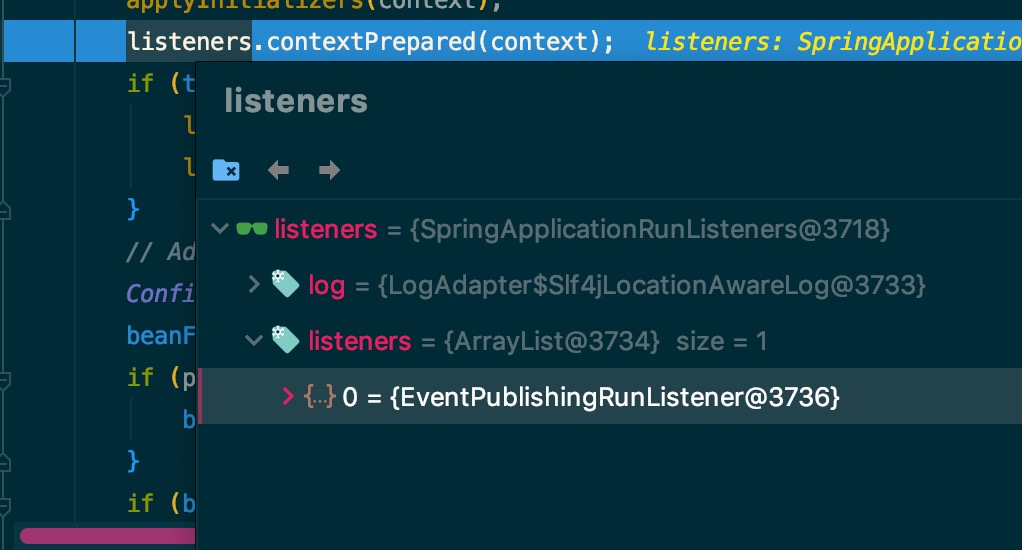
这行代码,获取了非常重要的SpringApplicationRunListener,这个监听器提供了很多应用生命周期不同阶段的事件监听,例如启动,上下文加载后,停止等。而这里的SpringApplicationRunListener正是读取的spring.factories文件中定义的监听器。紧接着就触发了启动事件。
1 | SpringApplicationRunListeners listeners = getRunListeners(args); |
在后续的几行代码也可以看到对listeners的environmentPrepared,contextPrepared,contextLoaded,started,running等方法的调用。
如下图,EventPublishingRunListener会去SimpleApplicationEventMulticaster发送真正的event事件,这是设计模式中的观察者模式在Spring应用中的体现。
ConfigurableEnvironment也是Spring中非常重要的一个组件,包含了2部分: profiles 和 properties,profile用来分组不同的属性,表示当前应用启动的环境,同一时刻只会有一个profile处于激活状态,例如dev,test,uat,prod等,property通常用${…}这种placeholder的方式被开发人员获取。
prepareEnvironment方法里面就会调用这2个方法,对property和profile进行配置。
1 | configurePropertySources(environment, args); |
然后就是banner的打印,默认打印的代码实现在SpringBootBanner里。
1 | Banner printedBanner = printBanner(environment); |
创建应用上下文,会通过webApplicationType变量判断创建不同的上下文类型,然后准备、刷新上下文
1 | context = createApplicationContext(); |
在prepareContext方法里,有logStartupInfo和logStartupProfileInfo打印启动的日志,加载profile的日志。
refreshContext就调用了ApplicationContext的refresh方法,对上下文里的东西做了很多初始化。
最后,stopWatch.stop();记录了应用启动的耗时,并进行日志打印,到此,SpringBoot应用启动流程完成。
callRunners触发调用我们自定义的ApplicationRunner和CommandLineRunner,等于是应用启动完成之后的回调。
总结
本文系统讲解了技术要点,通过学习掌握核心知识和实践方法。