Spring Cloud微服务 02:Spring Boot起步
微服务学习笔记
Spring Boot
https://spring.io/projects/spring-boot#learn
要创建一个Spring Boot项目,可以去https://start.spring.io/,一键创建。
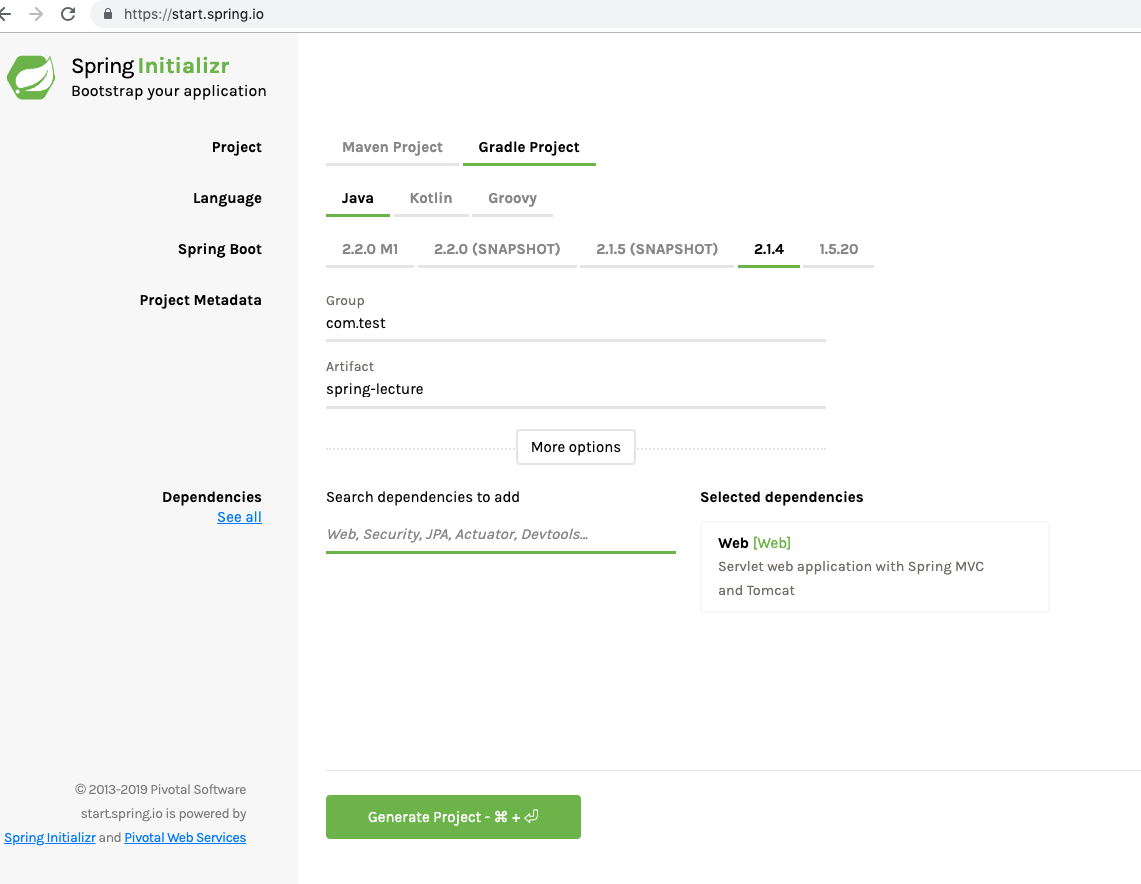
依赖中加入Web,然后点击Generate Project,就会下载一个压缩包。
解压后看看目录结构:
1 | spring-lecture tree |
在build.gradle中包含了依赖的配置。
1 | plugins { |
可以看到引入了spring-boot-starter-web的依赖,因为io.spring.dependency-management插件的关系,所以在配置文件里不需要写版本号,就像maven里的dependencyManagement一样。
源码地址:
https://github.com/sail-y/spring-cloud-lecture
执行命令gradle bootRun,就能启动,访问 http://127.0.0.1:9090/api/test
返回
1 | { |
几乎所有的配置都可以在application.properties文件里完成,这里用server.port配置了一个端口号,Spring Boot也支持yml格式的配置文件。这也是我自己在项目中一直使用的格式。
bootJar
执行gradle task,可以看到Spring Boot插件为我们提供了几个任务,其中一个是bootRun,可以直接启动应用。bootJar,可以把应用打包成一个fat jar。用java -jar spring-lecture-0.0.1-SNAPSHOT.jar就可以启动应用,这跟普通的jar包不一样。
现在解压这个jar包来看看里面的内容,跟传统的jar或者war包不一样,解压后并没有看到我们自己的代码编译后的文件在哪里,在根目录下的org里的class文件却并不是我们自己写的,下面分析一下解压后的目录结构
1 | jar -xvf spring-lecture-0.0.1-SNAPSHOT.jar |
内容如下:
1 | libs (master✔)ls |
BOOT-INF里包含了我们自己项目里编译后的配置文件和class文件,以及lib里包含的项目依赖的三方jar。
接下来看META-INF
1 | ➜ libs (master✔)cat META-INF/MANIFEST.MF |
Main-Class是打包的jar包含main方法的启动类,Start-Class是Spring Boot自定义的属性。
注意Main-Class最后有一个回车换行,这个是必须的,不然无法使用。
接下来看另外一个文件夹org,这里面的类是Spring Boot打包插件在打jar包的时候自动放进去的,Spring Boot这些类功能很巧妙的解决了fat jar是如何打包出来的,以及BOOT-INF下面的类和jar包是如何被加载的。
1 | org |
这都是SpringBoot提供的类,发现没有?org.springframework.boot.loader.JarLauncher就在这里。这样的文件结构,和这些类都是什么意思呢?
如果我们要查看org.springframework.boot.loader.JarLauncher的源码,需要引入以下依赖:
1 | implementation 'org.springframework.boot:spring-boot-loader' |
这是插件的一个依赖,在实际开发中,我们并不需要引入这个依赖,现在我们可以查看这个类的源码。
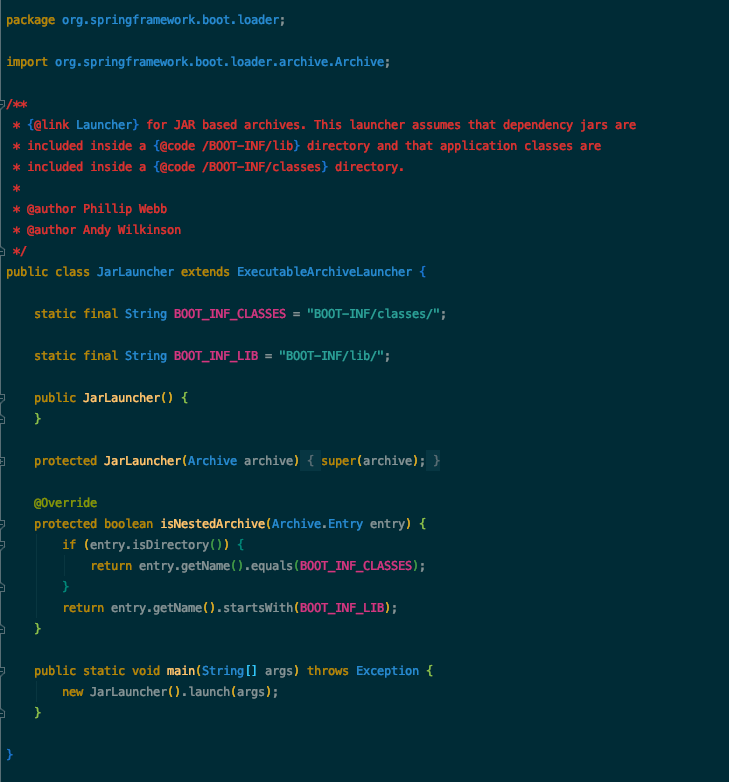
javadoc解释了,Launcher假设依赖包在/BOOT-INF/lib文件夹中,应用的class文件在/BOOT-INF/classes中。
ExecutableArchiveLauncher的子类除了JarLauncher,还有一个WarLauncher。从名字就能看出来,是分别用于启动Jar包和War包的启动类。
main方法:
new JarLauncher().launch(args);
launch方法doc:
1 | /** |
这里构建了一个类加载器。
它会找到类当前路径所在的jar包,得到一个archive对象。因为jar包的标准是只能加载根目录下的class文件,无法加载jar包里面的jar包,所以spring boot自己实现了类加载器来加载我们应用的第三方依赖和classes文件。
JarLauncher.isNestedArchive就包含了这部分的判断逻辑。处理了BOOT-INF/classes/的目录和以BOOT-INF/lib/开头的文件,此方法在getClassPathArchives内部被调用。
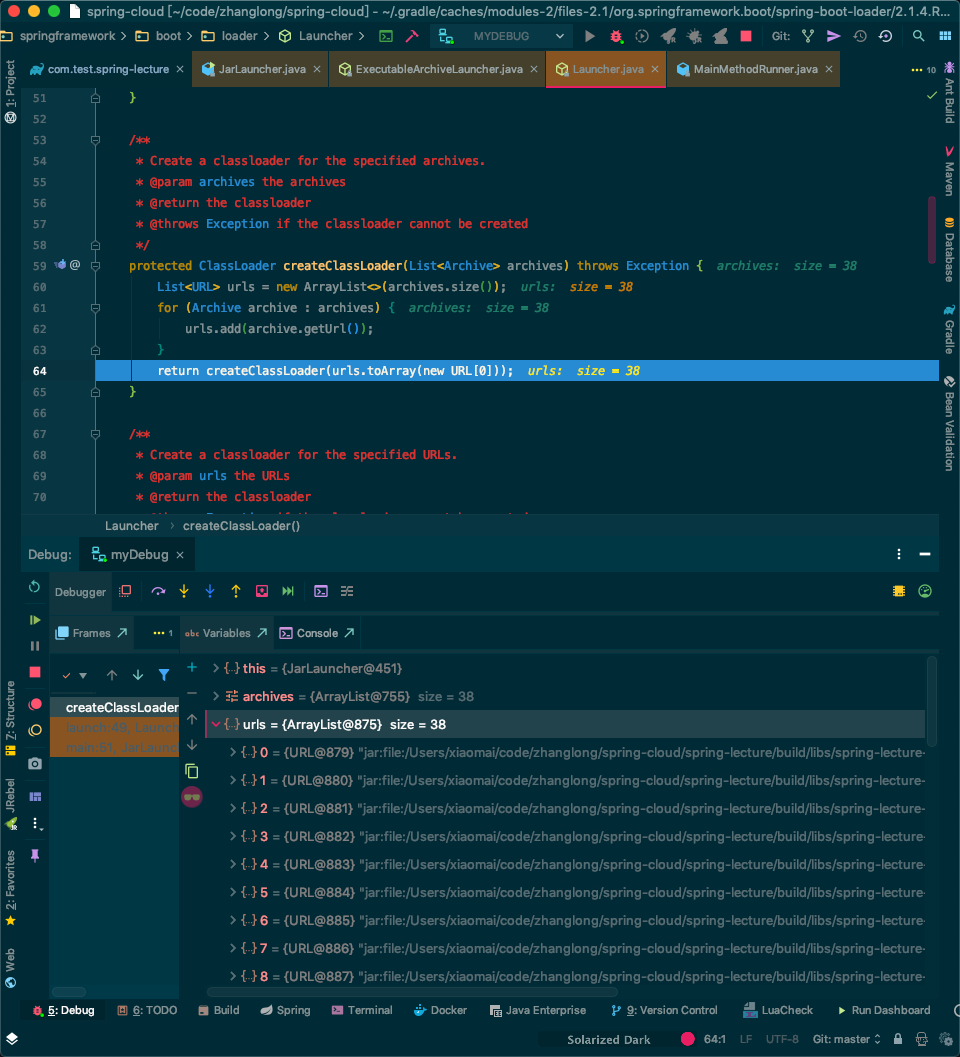
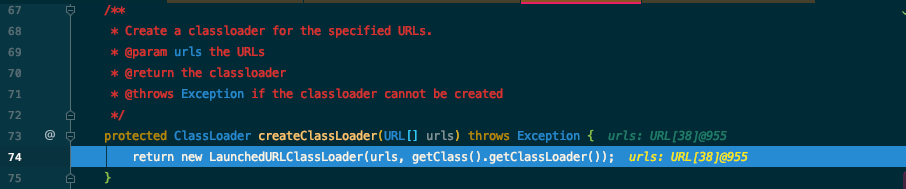
ClassLoader classLoader = createClassLoader(getClassPathArchives());则是为了加载这2个目录下的class和jar包,最后代码跟踪到new LaunchedURLClassLoader(urls, getClass().getClassLoader());。LaunchedURLClassLoader就是Spring Boot提供的全新的类加载器了。
URLClassLoader是ClassLoader的子类,它用于从指向 JAR 文件和目录的 URL 的搜索路径加载类和资源。也就是说,通过URLClassLoader就可以加载指定jar中的class到内存中。
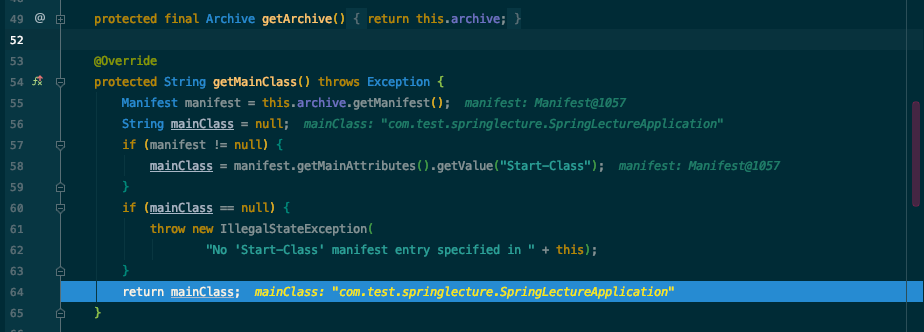
再来关注launch(args, getMainClass(), classLoader);这行代码,getMainClass()从Manifest文件里读取了Start-Class,也就是我们自己的应用的启动类。
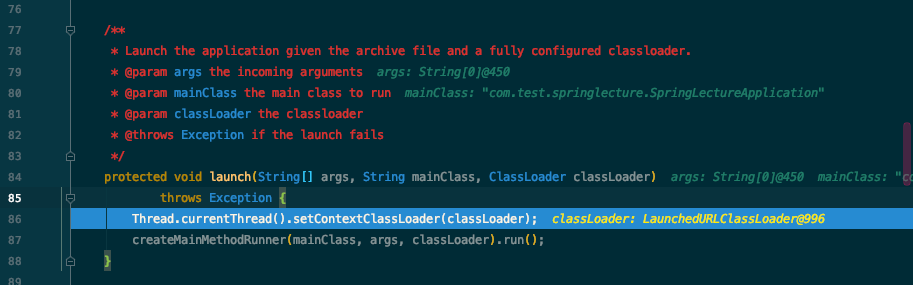
然后是launch方法的调用
1 | Thread.currentThread().setContextClassLoader(classLoader); |
把SpringBoot提供的类加载器,设置成线程上下文类加载器。
createMainMethodRunner创建main方法的执行器。这里有关键代码,我们的启动类是如何被加载和启动的。
MainMethodRunner.run
1 | public void run() throws Exception { |
获得之前设置的类加载器,进行类加载,然后用反射的方式调用main方法。
mainMethod.invoke(null, new Object[] { this.args });这行代码反射,前面是null,是因为main方法是静态的,所以不需要传对象进去。
以上就解释了jar包里的文件夹结构,以及加载启动类的流程。
验证
增加一行代码打印SpringLectureApplication这个类的类加载器
1 |
|
试想一下,用java -jar启动,和在IDE里右键启动,打印出来的内容会是一样的吗?
右键启动输出:
1 | sun.misc.Launcher$AppClassLoader@58644d46 |
jar包启动输出:
1 | org.springframework.boot.loader.LaunchedURLClassLoader@17a7cec2 |
JDWP远程调试
Java Debug Wire Protocol,Java调试协议
我们可以用远程的方式去调试一个正在运行的应用,比如打断点什么的。
1 | ➜ ~ java -agentlib:jdwp=help |
有一些参数,示例如下:
1 | ➜ spring-lecture (master) ✗)java -agentlib:jdwp=transport=dt_socket,server=y,suspend=y,address=5050 -jar build/libs/spring-lectListening for transport dt_socket at address: 5050 |
调试器的服务端已经启动,等待调试器连接,现在我们去用idea的调试器去调试。
选择Remote类型,选择Attach to remote JVM,设置端口为5050,可以看到idea自动为我们生产了参数:-agentlib:jdwp=transport=dt_socket,server=y,suspend=n,address=5050。
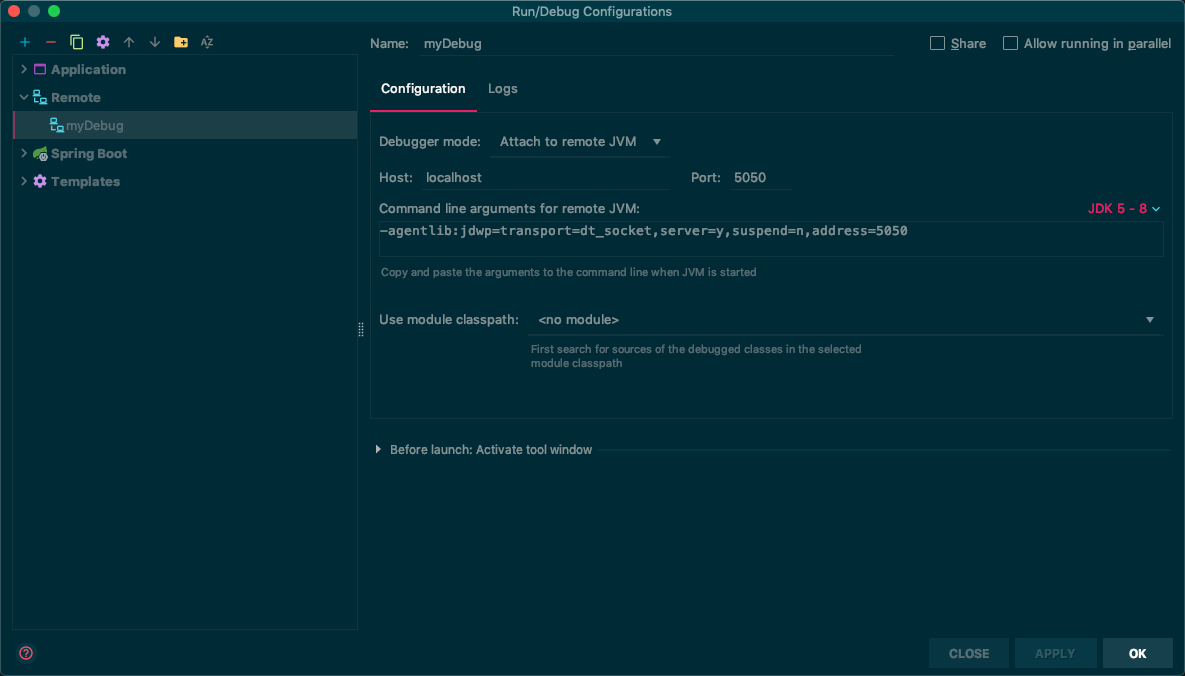
这样的话,点击debug按钮,IDEA就能走到我们断点的地方。
这样就可以在启动的时候用debug的方式去跟踪SpringBoot启动的流程。
通过这个图就可以看到,这里是archives对象里包含的就是应用里依赖的所有第三方jar包。
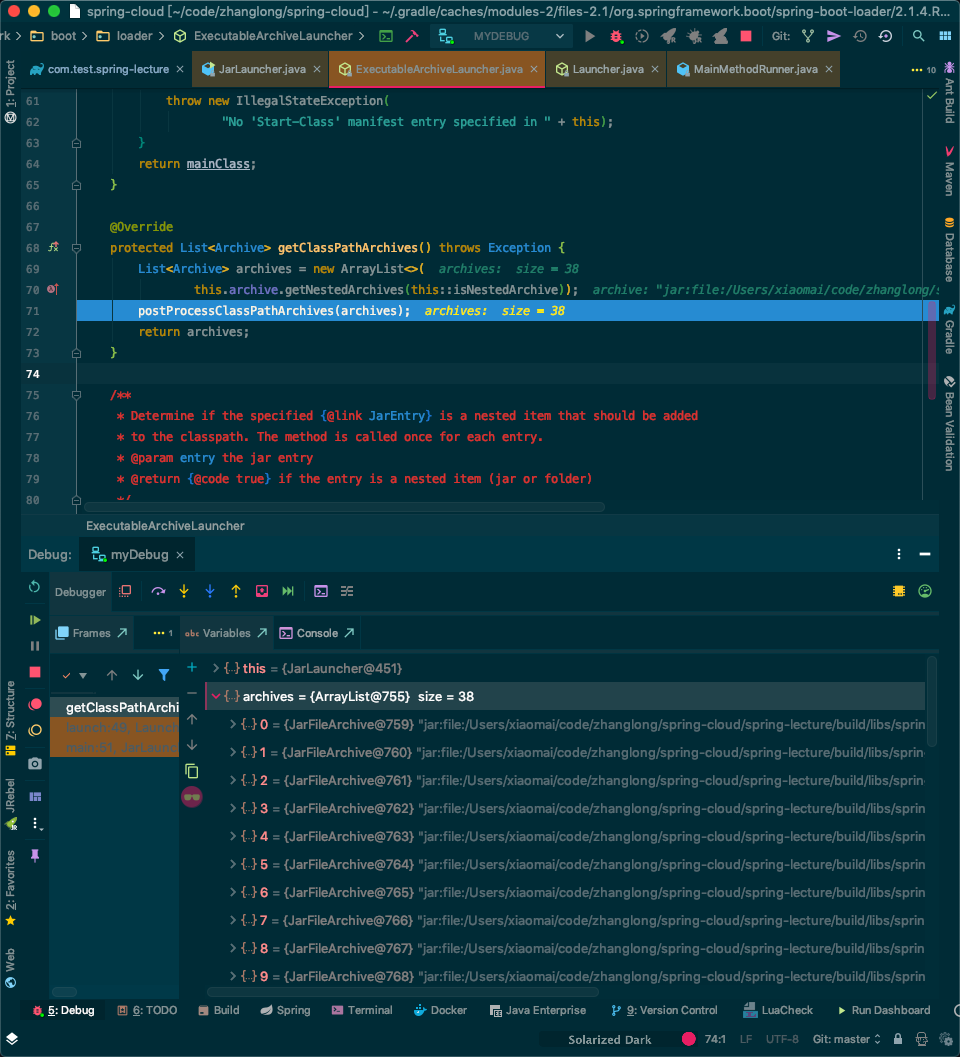
在获取到jar的url以后,会创建一个LaunchedURLClassLoader,用于加载这些jar包,同时这里也指定了父加载器。
继续往下走,就能验证上一节说的读取Start-Class具体的类名。
在设置上下文类加载器之前,它的值是AppClassLoader
再往下,就是根据找到的MainClass创建一个MainMethodRunner,通过之前设置的线程上下文类加载获取之前设置的类加载器,来加载MainClass,然后用反射的方式执行。

@SpringBotApplication
接下来回到源代码上,SpringLectureApplication上面的@SpringBootApplication,标识了一个SpringBoot应用,他会自动扫描这个类,以及这个类以下的子包。
如果不加这个注解,会怎么样?试试看,会得到一个错误missing ServletWebServerFactory bean,没有这个注解,SpringBoot是无法启动的,除了SpringBootApplication注解,各种注解在SpringBoot项目中扮演着很重要的角色。
1 | org.springframework.context.ApplicationContextException: Unable to start web server; nested exception is org.springframework.context.ApplicationContextException: Unable to start ServletWebServerApplicationContext due to missing ServletWebServerFactory bean. |
现在是SpringApplication的静态方法启动的应用,实际上我们可以手动一步一步的启动。
1 | public static void main(String[] args) { |
其实对于使用者来讲,SpringBoot和传统的Spring MVC应用差别并不是很大,都是通过注解的方式来写Controller,Controller里面持有service变量,再层层调用。那么SpringBoot的便利之处就在于配置变少了,约定优于配置。
看一下SpringBootApplication注解的源码,相当于同时声明了3个注解@SpringBootConfiguration,@EnableAutoConfiguration,@ComponentScan。@SpringBootConfiguration里面又包含了@Configuration
1 |
@Configuration
1 | Indicates that a class declares one or more methods and may be processed by the Spring container to generate bean definitions and service requests for those beans at runtime, for example: |
@Configuration是通过AnnotationConfigApplicationContext或者AnnotationConfigWebApplicationContext启动的,通过AnnotationConfigApplicationContext将AppConfig注册到上下文中,就能从上下文获取MyBean的实例了。
JDK源码里的文档,详细介绍了@Configuration注解相关的另外内容,其中包括:
- @ComponentScan
- @Autowired Environment env
- @PropertySource
- @Import
- @Profile
- @ImportResource
- @Lazy
- @RunWith
- @ContextConfiguration
- 等等
@EnableAutoConfiguration
Enable auto-configuration of the Spring Application Context, attempting to guess and configure beans that you are likely to need. Auto-configuration classes are usually applied based on your classpath and what beans you have defined
it will be used when scanning for @Entity classes. It is generally recommended that you place @EnableAutoConfiguration (if you’re not using @SpringBootApplication) in a root package so that all sub-packages and classes can be searched.
Auto-configuration classes are regular Spring Configuration beans. They are located using the SpringFactoriesLoader mechanism (keyed against this class). Generally auto-configuration beans are @Conditional beans (most often using @ConditionalOnClass and @ConditionalOnMissingBean annotations).
自动装配,注解扫描当前包及以下的@Configuration类,所以建议放在到根目录下。自动装配的bean通常用@Conditional一类的注解修饰。
@ComponentScan
配置扫描@Configuration组件的目录。
总结
本文系统讲解了技术要点,通过学习掌握核心知识和实践方法。