接下来看看如何用NIO来做一个模拟聊天,通过这个例子来更加理解NIO的使用方式,下面展示了服务端代码,用命令进行测试,然后再用NIO的方式编写客户端进行测试,对NIO的服务端和客户端的开发,都更加深入的理解。
服务端
1
2
3
4
5
6
7
8
9
10
11
12
13
14
15
16
17
18
19
20
21
22
23
24
25
26
27
28
29
30
31
32
33
34
35
36
37
38
39
40
41
42
43
44
45
46
47
48
49
50
51
52
53
54
55
56
57
58
59
60
61
62
63
64
65
66
67
68
69
70
71
72
73
74
75
76
77
78
79
80
81
82
83
84
85
86
87
88
89
90
91
92
93
94
95
96
97
98
99
100
101
102
103
104
105
106
107
|
public class NioServer {
private static Map<String, SocketChannel> clientMap = new HashMap<>();
public static void main(String[] args) throws IOException {
ServerSocketChannel serverSocketChannel = ServerSocketChannel.open();
serverSocketChannel.configureBlocking(false);
ServerSocket serverSocket = serverSocketChannel.socket();
serverSocket.bind(new InetSocketAddress(8899));
Selector selector = Selector.open();
serverSocketChannel.register(selector, SelectionKey.OP_ACCEPT);
while (true) {
try {
int nums = selector.select();
Set<SelectionKey> selectionKeys = selector.selectedKeys();
selectionKeys.forEach(selectionKey -> {
final SocketChannel client;
try {
if (selectionKey.isAcceptable()) {
ServerSocketChannel server = (ServerSocketChannel) selectionKey.channel();
client = server.accept();
client.configureBlocking(false);
client.register(selector, SelectionKey.OP_READ);
String key = "[" + UUID.randomUUID().toString() + "]";
clientMap.put(key, client);
}
else if (selectionKey.isReadable()) {
client = (SocketChannel) selectionKey.channel();
ByteBuffer readBuffer = ByteBuffer.allocate(1024);
int count = client.read(readBuffer);
String senderKey = null;
for (Map.Entry<String, SocketChannel> entry : clientMap.entrySet()) {
if (client == entry.getValue()) {
senderKey = entry.getKey();
break;
}
}
if (count > 0) {
readBuffer.flip();
Charset charset = Charset.forName("utf-8");
String receivedMessage = String.valueOf(charset.decode(readBuffer).array());
System.out.println(client + ":" + receivedMessage);
for (Map.Entry<String, SocketChannel> entry : clientMap.entrySet()) {
SocketChannel value = entry.getValue();
ByteBuffer writeBuffer = ByteBuffer.allocate(1024);
writeBuffer.put((senderKey + ": " + receivedMessage).getBytes());
writeBuffer.flip();
value.write(writeBuffer);
}
if (receivedMessage.equals("1")) {
selectionKeys.clear();
}
} else if (count == -1) {
clientMap.remove(senderKey);
}
}
} catch (Exception ex) {
ex.printStackTrace();
}
});
selectionKeys.clear();
} catch (Exception ex) {
ex.printStackTrace();
}
}
}
}
|
这部分代码基本上NIO开发的模板式代码,服务端启动代码。
1
2
3
4
| ServerSocketChannel serverSocketChannel = ServerSocketChannel.open();
serverSocketChannel.configureBlocking(false);
ServerSocket serverSocket = serverSocketChannel.socket();
serverSocket.bind(new InetSocketAddress(8899));
|
open()一个Selector后,channel调用register将自己注册到selector上,并传入SelectionKey.OP_ACCEPT表示等待连接。
接下来selector.select();会阻塞,直到有客户端连接,程序才会继续往下走,selector.selectedKeys()返回有状态变化可以被使用的keys,每一个判断分支后对应的channel可以强转为对应的Channel。
比如代码中注册为OP_ACCEPT的是ServerSocketChannel,而注册为OP_READ的是一个SocketChannel。最后不要忘记将selectedKeys清空,否则下次循环进入,遗留下来的selectKey.channel()是获取不到对应的Channel的。
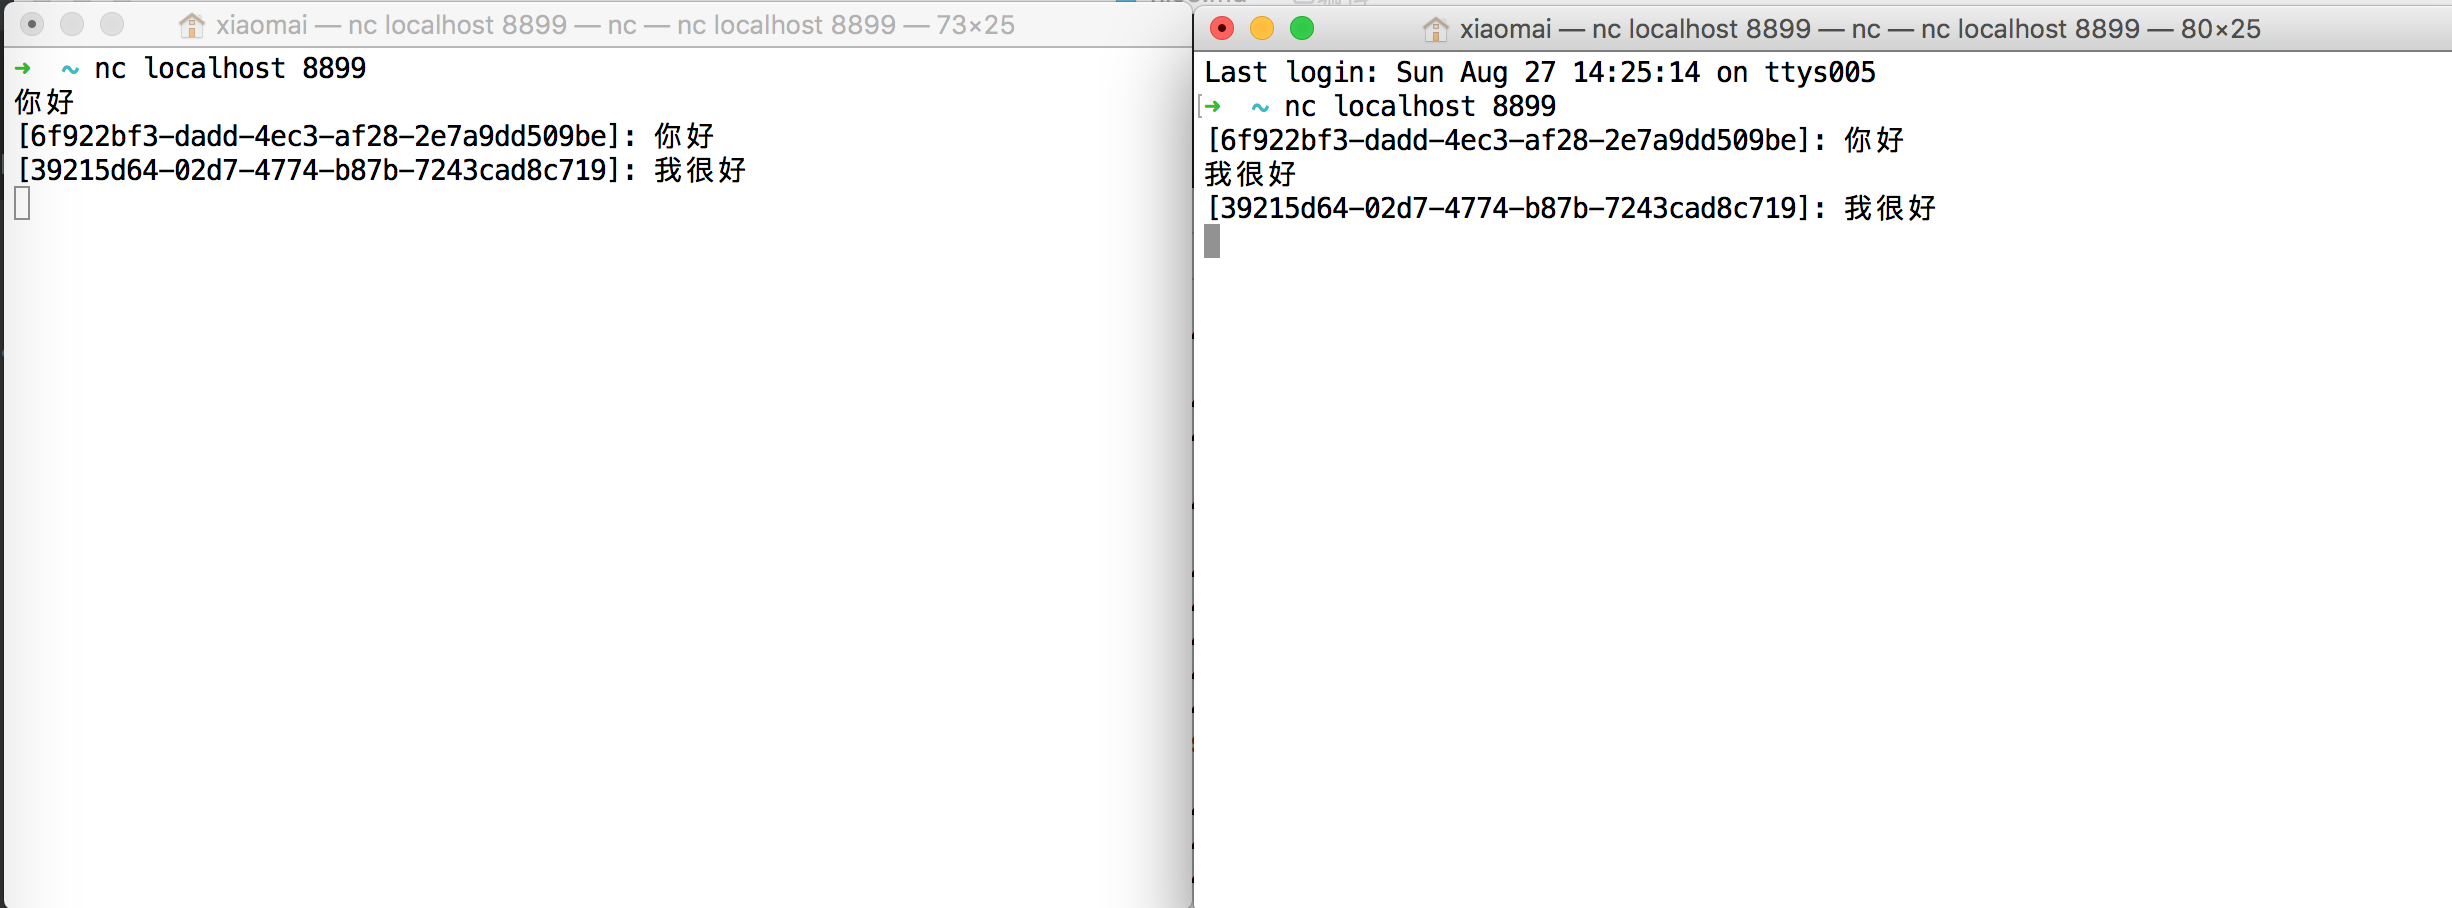
用命令先测试一下,结果如下,一方发送一条消息后,都收到了消息输出,并且带上了连接的时候生成的客户端ID。
客户端
NIO客户端的开发,代码跟服务端的差不多,只是由ServerSocketChannel,换成了SocketChannel。
1
2
3
4
5
6
7
8
9
10
11
12
13
14
15
16
17
18
19
20
21
22
23
24
25
26
27
28
29
30
31
32
33
34
35
36
37
38
39
40
41
42
43
44
45
46
47
48
49
50
51
52
53
54
55
56
57
58
59
60
61
62
63
64
65
66
67
68
69
70
71
72
73
74
75
76
77
78
79
80
81
82
83
84
85
|
public class NioClient {
public static void main(String[] args) throws IOException {
try {
SocketChannel socketChannel = SocketChannel.open();
socketChannel.configureBlocking(false);
Selector selector = Selector.open();
socketChannel.register(selector, SelectionKey.OP_CONNECT);
socketChannel.connect(new InetSocketAddress("localhost", 8899));
while (true) {
selector.select();
Set<SelectionKey> selectionKeys = selector.selectedKeys();
selectionKeys.forEach(selectionKey -> {
try {
if (selectionKey.isConnectable()) {
SocketChannel client = (SocketChannel) selectionKey.channel();
if (client.isConnectionPending()) {
client.finishConnect();
ByteBuffer writeBuffer = ByteBuffer.allocate(1024);
writeBuffer.put((LocalDateTime.now() + " 连接成功").getBytes());
writeBuffer.flip();
client.write(writeBuffer);
ExecutorService executorService = Executors.newSingleThreadExecutor(Executors.defaultThreadFactory());
executorService.submit(() -> {
while (true) {
writeBuffer.clear();
InputStreamReader input = new InputStreamReader(System.in);
BufferedReader br = new BufferedReader(input);
String sendMessage = br.readLine();
writeBuffer.put(sendMessage.getBytes());
writeBuffer.flip();
client.write(writeBuffer);
}
});
}
client.register(selector, SelectionKey.OP_READ);
} else if (selectionKey.isReadable()) {
SocketChannel client = (SocketChannel) selectionKey.channel();
ByteBuffer readBuffer = ByteBuffer.allocate(1024);
int count = client.read(readBuffer);
if (count > 0) {
String receivedMessage = new String(readBuffer.array(), 0, count);
System.out.println(receivedMessage);
}
}
} catch (Exception e) {
e.printStackTrace();
}
});
selectionKeys.clear();
}
} catch (IOException ex) {
ex.printStackTrace();
}
}
}
|
启动客户端后输出:

mac用户会看到后面有很多框框,感觉有点奇怪,是哪里出问题了呢?
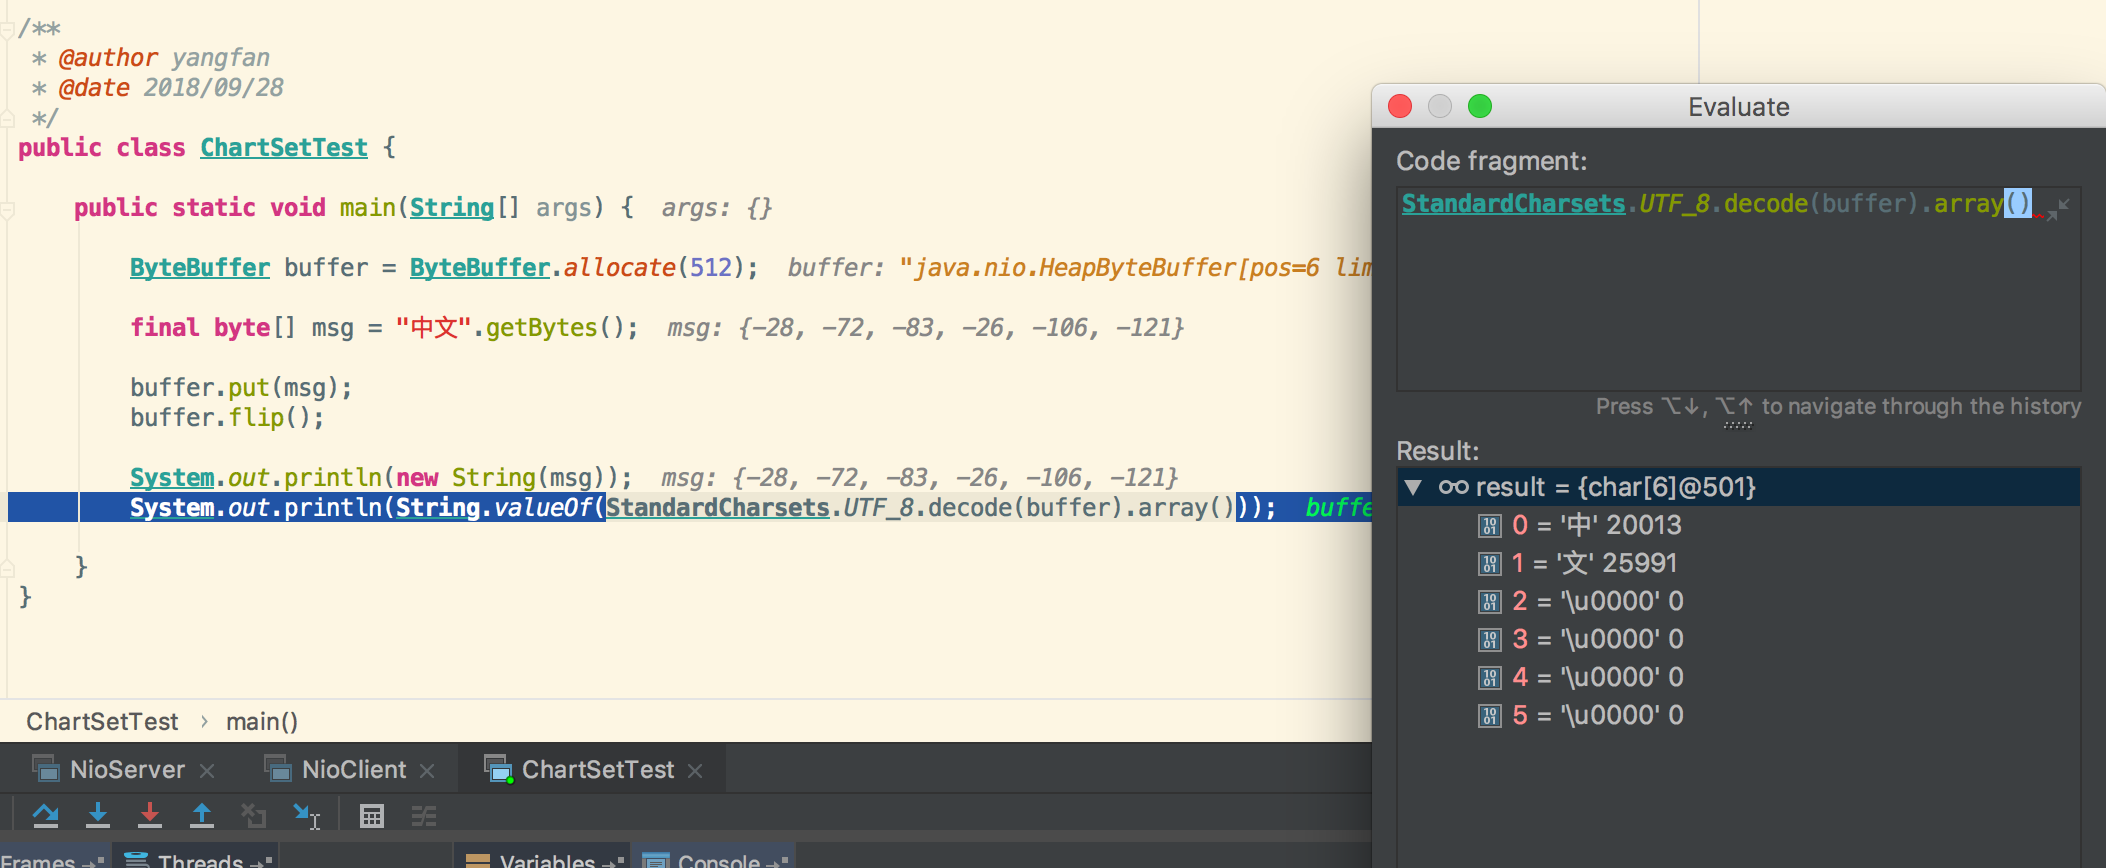
单独用一个例子来说明:
1
2
3
4
5
6
7
8
9
10
11
12
13
14
15
16
| public class ChartSetTest {
public static void main(String[] args) {
ByteBuffer buffer = ByteBuffer.allocate(512);
final byte[] msg = "中文".getBytes();
buffer.put(msg);
buffer.flip();
System.out.println(new String(msg));
System.out.println(String.valueOf(StandardCharsets.UTF_8.decode(buffer).array()));
}
}
|
在这个例子中,真相就是buffer的数组在这里是6个字节,decode转换成中文以后,数组里就只有2个元素了,但是长度还是6,还有4个\u0000占位,可以在debug的时候看出来,这也就解释了前面的输出为什么会是那样了。
总结
本文系统讲解了相关技术要点。通过学习掌握核心概念和实践方法,提升技术能力。
关键要点
- 理解核心技术原理
- 掌握实际应用方法
- 学习最佳实践和注意事项
实践建议
- 结合实际项目练习
- 深入研究官方文档
- 持续学习和实践