在spring cloud项目环境中配置oauth2.0认证。
http://callistaenterprise.se/blogg/teknik/2015/04/27/building-microservices-part-3-secure-APIs-with-OAuth/
可以先看看这篇文章。
我花了不少时间才把这个调通,spring cloud的版本和文档也存在不一致的地方。
以下所有的操作都基于Brixton.RC1搭建,须保持所有相关项目都引用此parent。否则会出现各种莫名其妙的错误。
1
2
3
4
5
6
| <parent>
<groupId>org.springframework.cloud</groupId>
<artifactId>spring-cloud-starter-parent</artifactId>
<version>Brixton.RC1</version>
<relativePath/>
</parent>
|
https://spring.io/blog/2015/11/30/migrating-oauth2-apps-from-spring-boot-1-2-to-1-3
这篇文章显示了不同版本之间的区别。
目前官网最新提供的Angel SR6和Brixton RC1,它们引用的Spring Boot版本不一样。这2个版本在Spring Security这一块改动比较大。
Spring Boot1.3 移除了官方文档中提到的@EnableOAuth2Resource注解。
http://cloud.spring.io/spring-cloud-static/spring-cloud.html#_token_relay
反正感觉官网提供这个文档写得不太对。
下面展示我最终正常运行的一个配置。
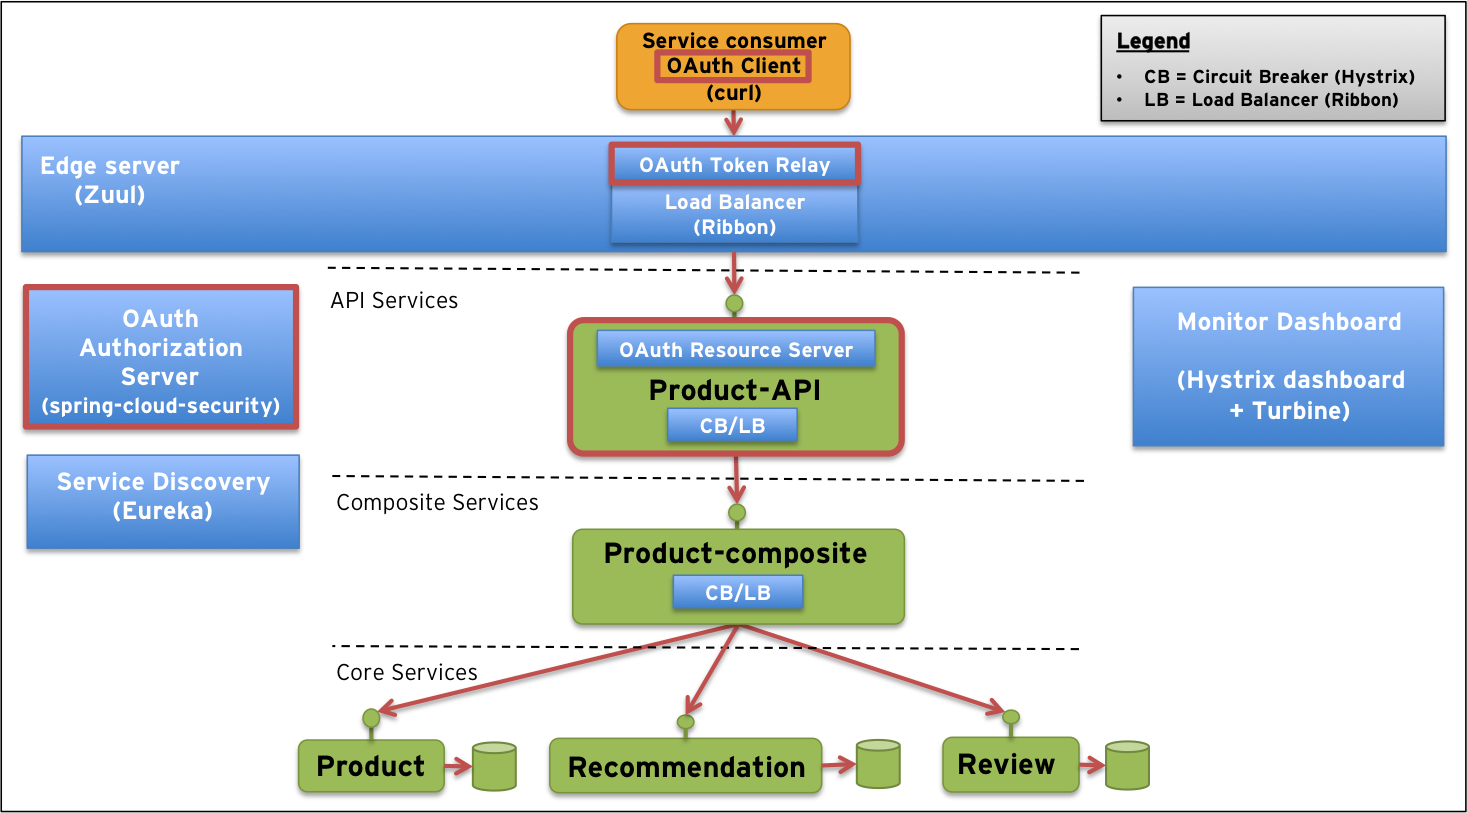
Zuul Proxy和AuthServer,我把它们放在了同一个应用里。
在pom中加入oauth2的依赖。
1
2
3
4
5
6
7
8
9
| <dependency>
<groupId>org.springframework.cloud</groupId>
<artifactId>spring-cloud-starter-security</artifactId>
</dependency>
<dependency>
<groupId>org.springframework.cloud</groupId>
<artifactId>spring-cloud-starter-oauth2</artifactId>
</dependency>
|
然后是Application
1
2
3
4
5
6
7
8
9
10
11
12
13
14
15
16
17
18
19
20
21
22
23
24
25
26
27
28
29
30
31
32
33
34
35
36
37
38
39
40
41
42
43
44
45
46
47
48
49
50
51
52
53
54
55
56
57
58
59
60
61
62
63
64
65
66
67
68
69
70
71
72
73
74
75
76
77
78
79
80
81
82
83
84
| @SpringBootApplication
@EnableZuulProxy
@EnableResourceServer
@EnableAuthorizationServer
public class Application {
public static void main(String[] args) {
SpringApplication.run(Application.class, args);
}
@Configuration
protected static class OAuthSecurityConfig extends AuthorizationServerConfigurerAdapter {
@Autowired
private AuthenticationManager authenticationManager;
@Override
public void configure(AuthorizationServerEndpointsConfigurer endpoints) throws Exception {
endpoints.authenticationManager(authenticationManager);
}
@Override
public void configure(AuthorizationServerSecurityConfigurer oauthServer) throws Exception {
oauthServer.checkTokenAccess("isAuthenticated()");
}
@Override
public void configure(ClientDetailsServiceConfigurer clients) throws Exception {
clients.inMemory()
.withClient("clientId")
.secret("secretId")
.authorizedGrantTypes("authorization_code", "client_credentials")
.scopes("app");
}
}
@Configuration
protected static class RestSecurityConfig extends WebSecurityConfigurerAdapter {
@Override
protected void configure(HttpSecurity http) throws Exception {
http.anonymous().disable()
.sessionManagement()
.sessionCreationPolicy(SessionCreationPolicy.STATELESS)
.and()
.exceptionHandling()
.and()
.authorizeRequests()
.anyRequest().authenticated().and().csrf().disable();
}
@Override
public void configure(WebSecurity web) throws Exception {
web.ignoring().antMatchers("/hystrix.stream/**", "/info", "/error");
}
}
}
|
然后在API里同样加入依赖
1
2
3
4
5
6
7
8
9
10
| <dependency>
<groupId>org.springframework.cloud</groupId>
<artifactId>spring-cloud-starter-security</artifactId>
</dependency>
<dependency>
<groupId>org.springframework.cloud</groupId>
<artifactId>spring-cloud-starter-oauth2</artifactId>
</dependency>
|
在application.yml中加入以下配置:
1
2
3
4
5
6
7
8
9
10
| security:
oauth2:
resource:
token-info-uri: http://localhost:10000/oauth/check_token
client:
client-id: clientId
client-secret: secretId
user-authorization-uri: http://localhost:10000/oauth/authorize
access-token-uri: http://localhost:10000/oauth/token
grant-type: client_credentials
|
Application.java中加上@EnableResourceServer
1
2
3
4
5
6
7
8
9
10
11
12
13
14
15
16
17
| @EnableResourceServer
public class Application {
public static void main(String[] args) {
SpringApplication.run(Application.class, args);
}
@Configuration
protected static class RestSecurity extends WebSecurityConfigurerAdapter {
@Override
public void configure(WebSecurity web) throws Exception {
web.ignoring().antMatchers("/info", "/error");
}
}
}
|
配置完了,启动应用。
获取access_token。
1
2
3
4
5
6
7
8
9
10
11
|
curl -s clientId:secretId@localhost:10000/oauth/token  \
 -d grant_type=client_credentials \
 -d scope=app

 {
  "access_token": "8265eee1-1309-4481-a734-24a2a4f19299",
  "token_type": "bearer",
  "expires_in": 43189,
  "scope": "app"
}
|
访问API的时候在Http Header中带上,Authorization: Bearer$access_token。即可…
总结
本文系统讲解了技术要点,通过学习掌握核心知识和实践方法。